Continuous Words Connected by Heart Silhouette

Last week I shared a quick monogram heart Valentine's Day shirt (you can find the red raglan shirts here) I made, with my Silhouette (duh), for my daughter. I got a few requests for a tutorial so I thought I'd share with you how I designed it in Silhouette Studio. Some people call this type of design word art others call it shape text. Whatever you call it, the process works for three letter monograms and full words.
Open up Silhouette Studio.
Go to your library and find a heart. You must have a heart somewhere, right? I f you don't have a heart go find one in a google search and trace it in Studio. Or purchase one from the Silhouette Design Store.
Using the text tool, type out your word or monogram. I'm going to work with the word LOVE.

OPTIONAL, BUT RECOMMENDED STEPS:
- From the font style window pick a bold, san serif font. My go-to for this type of project is Abadi MT Condensed Extra.
- Select the font and from the font style window slide the character spacing bar to the right to bring the letters closer together.
Enlarge the font and center it over the heart. I think its easiest to work in a large scale here..and then resize down later. You basically want the edge of the word to line up with the edge of the heart. It's okay if it hangs over a little bit.

Select the font again and ungroup the letters (Right Click > Ungroup). This will allow you to resize each of the letters individually. You want to stretch the letters up and down so that some part of both the top and bottom is hanging over the edge of the heart.

Duplicate the heart (but not the text) and move the copy to the side. You'll be using it in a minute.
Go back to your original heart and text and select all of the letters and the heart at the same time. From the Modify window click "Crop." You'll go from what's on the left below to what's on the right.

It's not quite heart-like yet...but we're getting there.
Select the duplicate heart you made and from the offset window click "Offset" (circled below) and select a distance.
Leave the offset in place, and grab the inner (original size) heart. Move it over on top of your word.

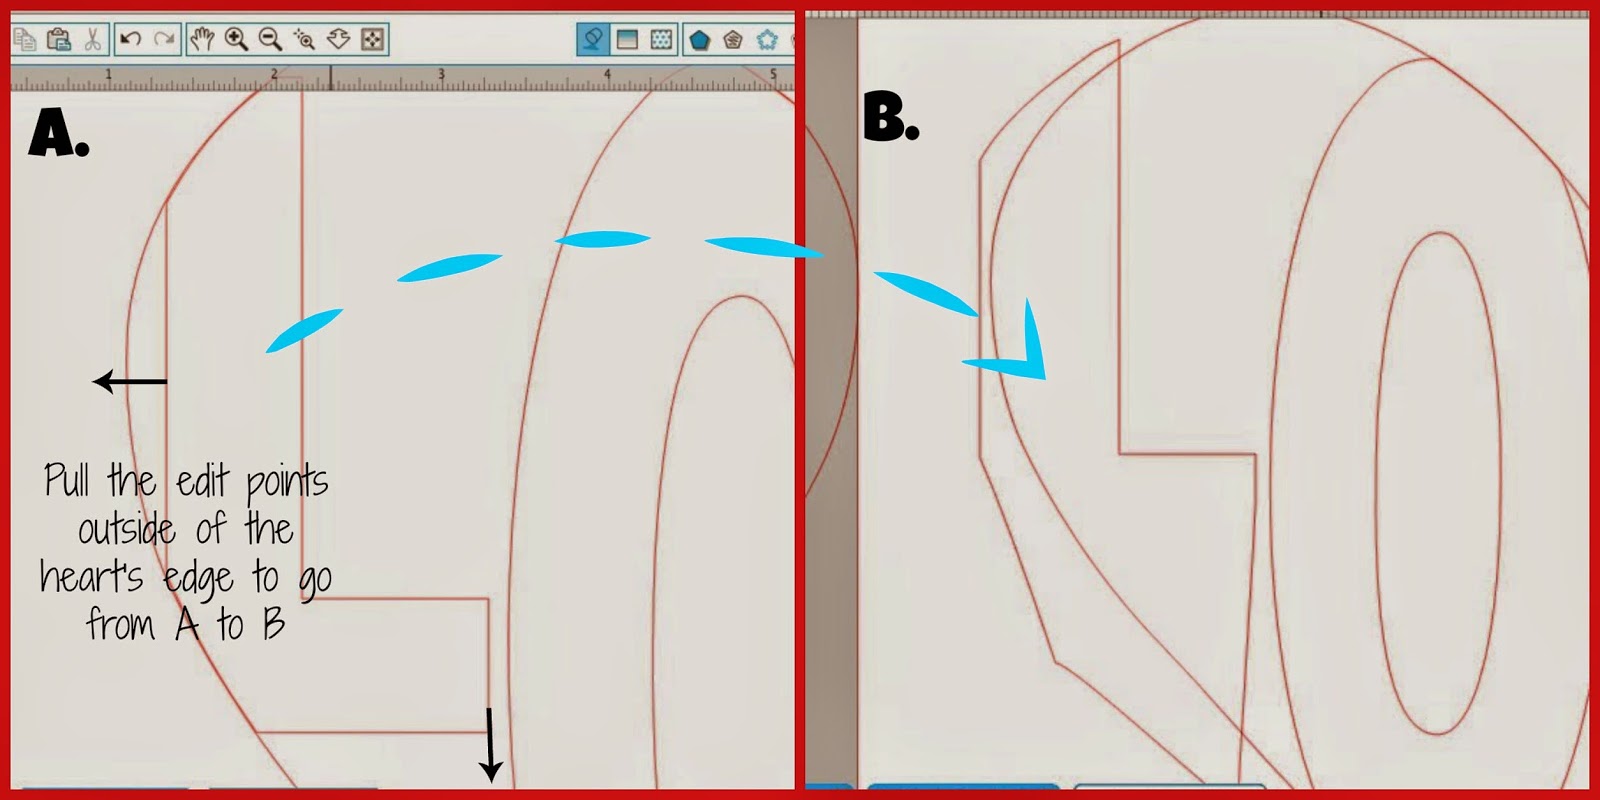
Now you're going to go through and double click on each individual letter, one at a time, so that you can get the edit points (little gray or white dots). Then use the mouse to pull those edit points over the edge of the heart so there are no gaps. For instance....the left side of the L needs to fill the left side of the heart; the bottom part of the L needs to take the shape of the bottom left part of the heart.

You want to continue doing this for all of the letters (the O did not need any adjusting). It's okay if the edit points are not neat..you are going to chop that messy part off in a minute.

Once you're to this point you want to once again select all of the letters AND the heart and from the modify window click "Crop"...just as you did before.

Group all of the letters together so they stay in position. Select > Right Click > Group.
Position the offset heart, that you created a few steps back, around your word art. Now pick what you want your finished design to look like...A or B.**
Option A:

Select both the offset and the text and make it a compound path (right click > make compound path).
Now when you fill in this design you'll get the above!
When you cut it you'd actually
weed out the lettersto reveal the heart with the word LOVE in it.
Option: B

Add another offset around the heart.
Select both hearts (both offsets) and make them a compound path (Right click > Make Compound Path).
Fill in each letter and the heart frame using the fill tool (this just makes it easier to see what your finished design will look like).
After you cut...weed out the middle of the heart leaving the letters in place.
Again, this method for Silhouette Studio word art works for any kind of shape text and any word or group of letters.

Note: This post may contain affiliate links. By clicking on them and purchasing products through my links, I receive a small commission. That's what helps fund Silhouette School so I can keep buying new Silhouette-related products to show you how to get the most out of your machine!
Thanks for coming to class today at Silhouette School. If you like what you see, I'd love for you to pin it!


Source: https://www.silhouetteschoolblog.com/2015/01/silhouette-studio-word-art-tutorial.html
0 Response to "Continuous Words Connected by Heart Silhouette"
Post a Comment